New York - Munich - Portland - San Francisco - Seattle - Stockholm - Vancouver - Zurich
New York - Munich - Portland - San Francisco - Seattle - Stockholm - Vancouver - Zurich
'How-To' by Erik Gross
![]()
|
Notes:
These instructions apply to a 1995 NA DOHC Mitsubishi 3000GT, but are easily
adaptable to any model/year of 3000GT or Dodge Stealth. Note that my car does
not have an Exhaust Gas Recirculation (EGR) system, so if you have a CA
emissions or 1996+ car, you get to have more fun removing those connections.
|
![]()
|
Rationale: |
|
|
|
Why Do You Want To Do This? |
Spark plugs deteriorate
with time and usage. No spark = No fun. |
|
|
|
How Often Should You Do This? |
The Service Manual says that under normal conditions the stock platinum
plugs are to be replaced every 60,000 miles. Under "Severe Driving
Conditions", it recommends replacing the spark plugs every 15,000 miles,
platinum or not. Considering that the stock NGK plugs are over $10
each, I check mine every 15,000 - 30,000 miles and will replace them
when they look fouled, worn, etc., or when I hit 60,000 miles (whichever
comes first). The front bank are pretty easy to check, and if they're OK and
you have no performance problems, the back ones are probably OK as well.
|
|
|
|
How Long Will It Take Me To Do This? |
For your first time, plan on a couple of hours to a half a day, depending on
how mechanically inclined you are and how many parts you drop accidentally
into the nether regions of the engine bay. After you've done it once, you
should be able to complete the plug change in 90 minutes, if you're taking
your time, and about 45-60 minutes if you're in a hurry. |
|
|
|
Anything I Should Do Prior To Attempting This Procedure? |
Make sure that you have all the parts and tools you'll need. |
|
![]()
|
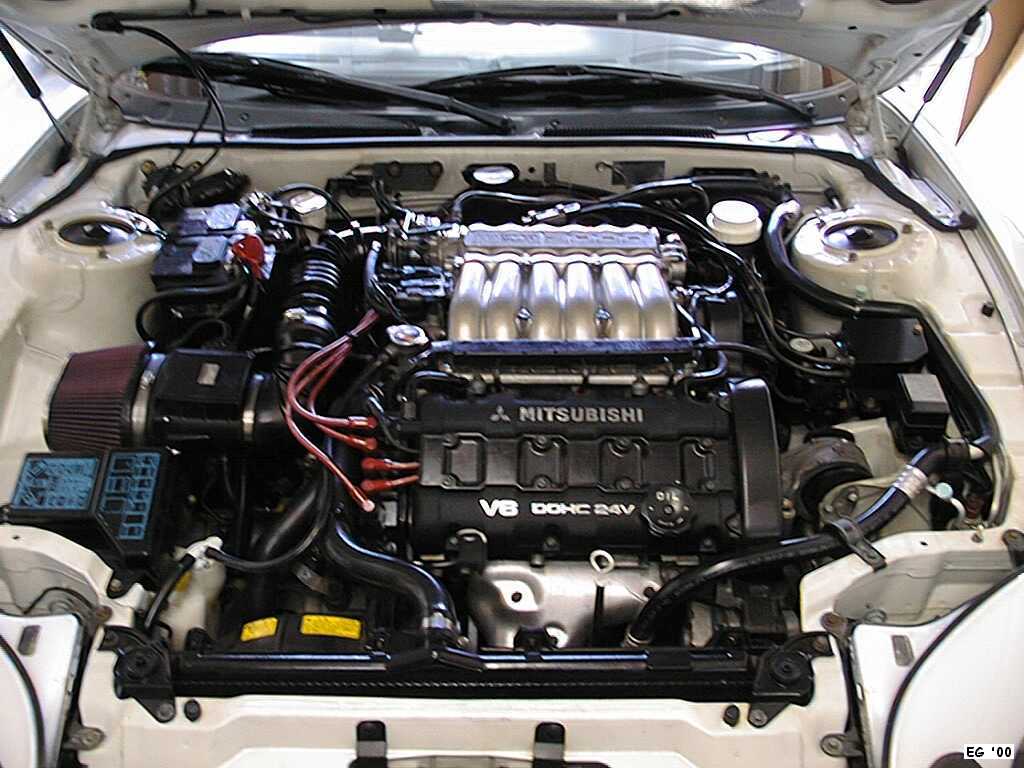
Under the Hood: |
|
|
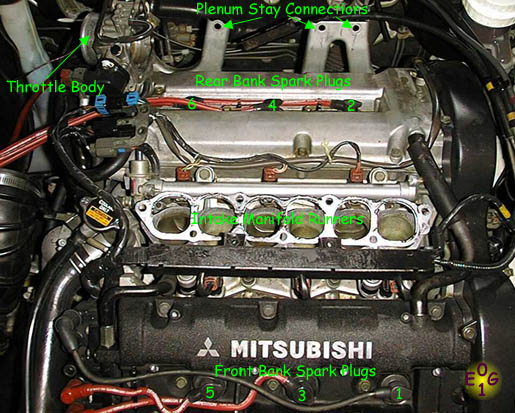
To get your bearings: the
intake plenum is the shiny metal thing with the six runners in the middle of
the engine bay; the throttle body is at the left rear of the plenum and is
attached to the black intake pipe (y-pipe on turbo models); The crankshaft
(and camshaft on 93+ models) position sensor harness(es) are on the right of
the engine near the timing belt covers. Also, the cylinders are numbered with
#1 being the front right (driver's side) and #2 being in the right rear. To it
say another way, the front bank is numbered, driver to passenger side (right
to left): 1, 3, 5 and the rear bank is numbered, driver to passenger side
(right to left): 2, 4, 6. The ignition coil packs are located to the left of
the front bank of the engine. There are numbers imprinted on the engine next
to the coil-side connectors for the ignition wires indicating to which
cylinder each wire is attached. Starting toward the rear of the car, the coil
pack connectors are attached to cylinders 1, 4, 2, 5, 3, and 6. |
![]()
|
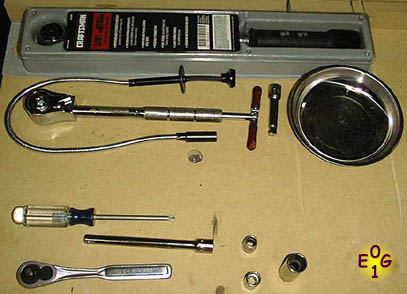
Tools You Will Need: |
|
|
Required (bottom)
Will Make Your Life Easier (top)
|
![]()
|
Mitsubishi Parts You Will Need: |
||
|
|
|
![]()
![]()
The Procedure:
![]()
|
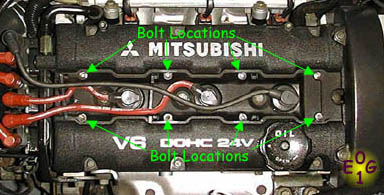
1. Remove Center Cover from Front Bank Valve Cover |
|
|
This plastic plate is held in by the 8 bolts at its edges and covers the front spark plug wires/wells. Use either a large Phillips screwdriver or a 10mm socket. Picture shown with plate removed. |
![]()
|
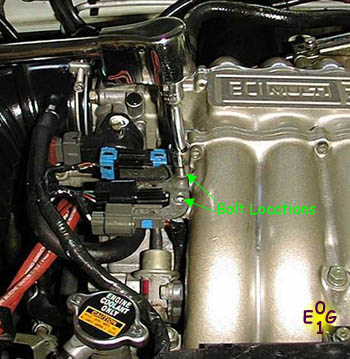
2. Remove Wiring Harnesses from Left Side of Intake Plenum |
|
|
Two 10mm bolts hold the bracket to the left side of the intake plenum. Remove the bolts and push the connectors away from the plenum. It is not necessary to unplug the connectors. |
![]()
|
3. Remove the Front Wiring Harness Rail |
|
|
Two 10mm bolts hold the wiring rail to the front of the intake plenum. Remove the bolts and pull the rail away from the plenum. |
![]()
|
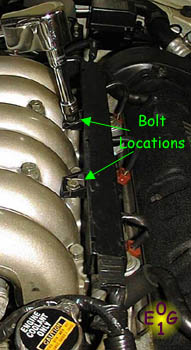
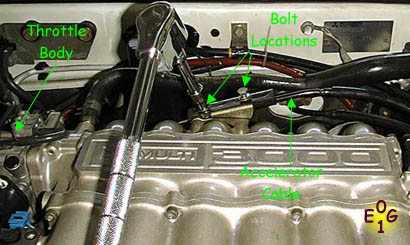
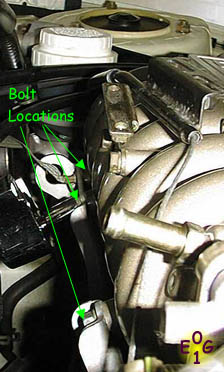
4. Remove the Accelerator Cable Bracket |
|
|
Two 10mm bolts (5 N*m) hold the accelerator cable to the rear of the intake plenum. Remove the bolts and pull the bracket away from the plenum. Leave the accelerator cable attached to the throttle body. Note when reinstalling the bracket, adjust the bracket position so that there is minimal play in the cable, but be sure that the throttle plate is completely closed when you are not pulling on the cable! |
![]()
|
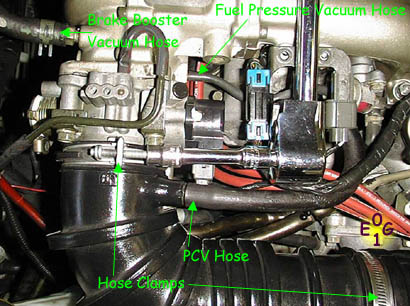
5. Disconnect the Intake Pipe, PCV Hose, |
|
|
---Loosen the two hose clamps at the ends of the intake pipe. |
![]()
|
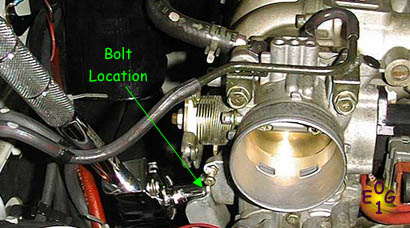
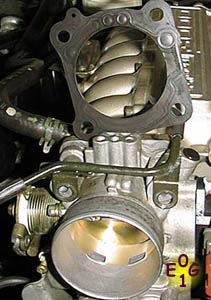
6. Remove the Throttle Body Stay Bolt |
|
|
One 12mm (18 N*m) bolt secures the rear of the throttle body to the engine. Remove the bolt. Pretty, shiny throttle body courtesy Mopar Combustion Chamber Cleaner (Chrysler P/N 04318001). |
![]()
|
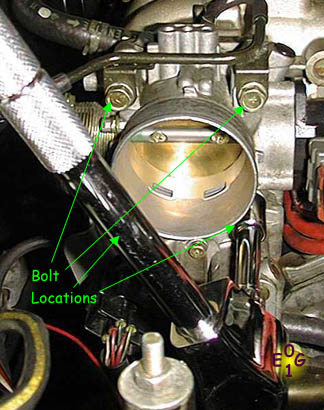
7. Remove the Throttle Body |
|
|
Four 12mm bolts (13 N*m) attach the throttle body to the intake plenum. Remove the bolts, and the throttle body will now be free from the plenum and its mounting bolt. Gently pull the throttle body away from the plenum, being careful not to lose the gasket (next step). Note that the throttle body will still be attached to some coolant lines and some vacuum lines, so do not attempt to remove the throttle body from the engine bay. |
![]()
|
8. Remove the Throttle Body Gasket |
|
|
The throttle body gasket is in between the throttle body and the intake plenum. Remove it, making note of the direction in which it is installed. Do not reinstall the used gasket - replace it with a new one! |
![]()
|
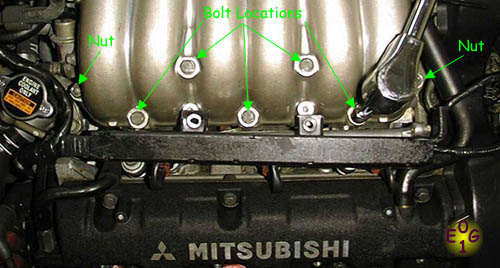
9. Remove the Intake Plenum Stay Bolts |
|
|
There are three 12mm (18 N*m) bolts that secure the rear of the intake plenum to the engine. Remove the bolts, noting that one bolt also secures a grounding cable to the chassis. |
![]()
|
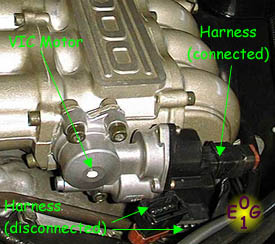
10. Remove the VIC Motor Wiring Harnesses |
|
|
There are two wiring harnesses attached to the Variable Induction Control(VIC) Motor. There is a silver wire clip (looks like a paper clip) that surrounds the harness connector. Carefully remove this with a small screwdriver. Then the harness connector will just slide off. |
![]()
|
11. Remove the Remaining Intake Plenum Bolts |
|
|
There are five more 12mm bolts (18 N*m) and two 12mm nuts (18 N*m) that attach the intake plenum to the intake manifold. Remove the bolts and the nuts, being careful not to let the lock washers or the nuts fall down into the murky depths of the engine bay, lest you never see them again. |
![]()
|
12. Lift the Intake Plenum Out of the Engine Bay |
|
|
At this point, the intake plenum is not connected to the engine, so you can simply lift it out. Do this carefully, and lift straight up until you clear the posts on the manifold. The picture shows the plenum partially lifted out, but not removed. You can also see the metal plenum-manifold gasket on top of the intake manifold. |
![]()
|
13. Remove the Intake Plenum Gasket |
|
|
The intake plenum gasket lies between the manifold and the plenum and can be removed once the plenum is removed. This gasket must be replaced whenever the intake plenum is removed, as should all such gaskets. You now have access to all 6 spark plugs and wires. A few points of interest and the cylinder numbers have been labeled for reference. |
![]()
|
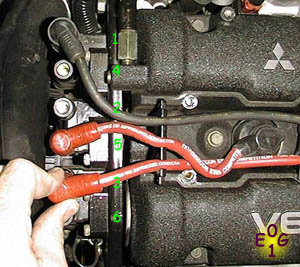
14. Remove the Coil-side Connections of the Ignition Wires |
|
|
Gently pull straight up. Repeat for remaining 5 cylinders. Note that the numbers are actually printed on the engine approximately where the green numbers are located. From the front of the car, the connections are: 6, 3, 5, 2, 4, 1. |
![]()
|
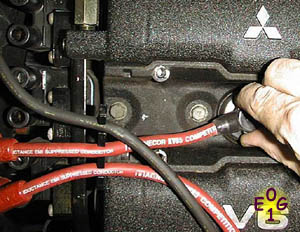
15. Remove the Plug-side Connections of the Ignition Wires |
|
|
Again, gently pull straight up; repeat for remaining 5 cylinders. |
![]()
|
16. Remove Spark Plugs |
|
|
With your spark plug socket on a 6" extension attached to your socket wrench, gently remove the spark plugs from the spark plug wells. As you remove the spark plugs, place them somewhere where you can later remember which plug came from which cylinder as this can help diagnose problems. When replacing the spark plugs, tighten them to 25 N*m with your torque wrench so you don't strip the threads! |
![]()
|
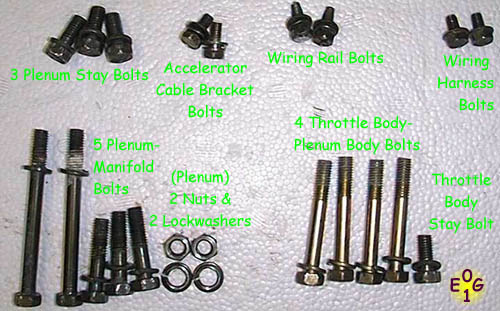
17. Reverse the Instructions to Reinstall Everything |
|
|
In case you forget where all the nuts and bolts you removed are supposed to go, here's a picture of all the parts you should have lying around. I've included the torque specifications in the above descriptions for each of the bolts you will be tightening. While it is not absolutely necessary to use a torque wrench, it is highly recommended, especially on the connections involving metal gaskets. |
|
|
{Clockwise from top left}
|
![]()
|
WARNING: The instructions on this page may involve hazardous conditions such as,
but not limited to, working with flammable liquids and having extremely heavy items
suspended over your head. If you are not comfortable working on your car, are not
mechanically inclined, do not have the proper tools, or tend to do stupid things
like extinguishing your cigarette butt in
a container of gasoline, please close your web browser and take your car to you local
mechanic and pay him to do the work you were going to attempt yourself. If you aren't good at following instructions exactly, or if you aren't handy with tools, or if you are just plain dumb as a rock, please read our blanket disclaimer HERE |
![]()

Article And Engine Images ©2000-2004 Erik Gross, All Rights Reserved.
Other Images ©1995-2004 Bob Forrest, All Rights Reserved.