Here are the detailed set of install notes.
1) Verify kit is complete with all parts: 2 Big Red calipers 2 aluminum
mounting brackets, 4 socket head cap screws, 4 hex head bolts, 8 Goodridge
stainless steel braided brake lines, 4 brass crush washers. Optional: 4 brake
pads and 4 SpeedBleeders. You will need to furnish your own fluid, rotors,
wrenches, and maybe brake pads. I use Motul 600 racing brake fluid and stock
2nd gen (94+) rotors.


2) Loosen lug nuts slightly on front wheels, jack up front end of car and
secure with jack stands, wheel chocks, etc. Remove front wheels. I also jacked
up the rear since I was adding SS lines to the rear. You can see the front
center and rear center jacking point.


3) Remove as much brake fluid from master cylinder reservoir as possible
(using turkey baster, etc.).

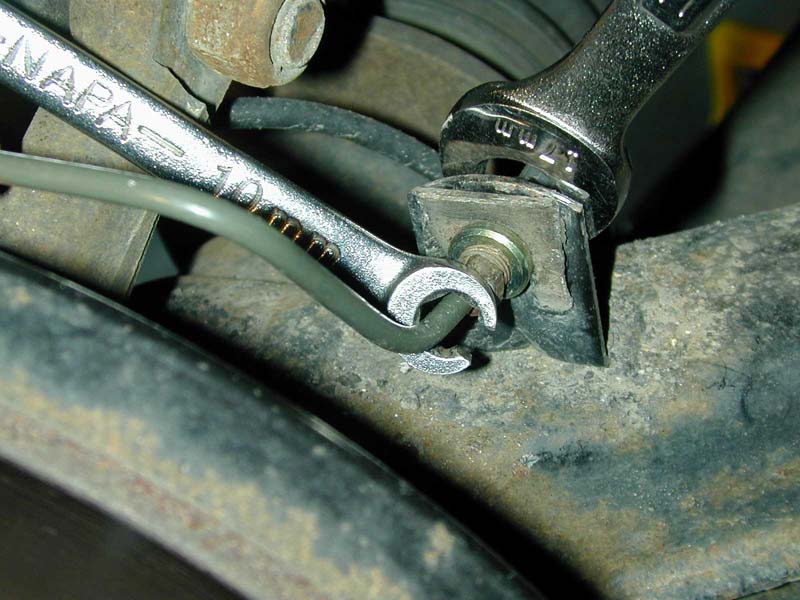
4) Locate the flexible brake hose which connects to the caliper and remove
it at the point where it connects to the steel brake line. You will need to
remove the square spring clip by pulling it firmly with pliers. Be careful
not to bend the clip. Drain as much fluid from both lines as possible, and
collect in an approved container. It is recommended that you use a set of
brake line wrenches. The two shown here are being used on the rear brake lines.


5) Remove the caliper by removing the 2 mounting bolts. This will be difficult
as there is not much room for leverage and these bolts have probably been
installed since the factory assembly. It is highly recommended that sufficient
amounts of WD-40, Liquid Wrench, Brakleen, etc. are used in the week leading
up to the install to aid in removing these and other bolts.


6) Remove the old rotor. It just slips off the lug studs, but may need to
be tapped with a mallet. If it is stubborn, you can use two 10mm bolts in
the small holes in the hat area (the holes that don’t have studs sticking
through them). If using these bolt holes, tighten the bolts evenly about ˝
turn at a time so you won’t jam the rotor. This is actually the new rotor
but who wants to see an old rotor anyway? You can see the mounting bracket
already in place on the hub but the dust shield is still attached.


7) Remove the ABS sensor line which is mounted to the dust shield. Remove
the dust shield with the three mounting bolts. Decide where to relocate the
ABS sensor line. Try securing it with a zip tie along side of where it mounts
to the strut. The picture where the dust shield has been removed does not
have the ABS sensor tied back yet.

8) Determine which Stainless Steel hose connects to the caliper. It’s the
one with a banjo fitting at one end. Connect the other end of the SS hose
to the steel line. Here you can see the two brass crush washers where the
banjo fitting connects to the caliper. ***

9) Mount the new rotor by sliding it on over the lug studs. Use Anti-seize
on the inside of the hat area to make future removal easier.
10) Mount the aluminum mounting bracket to the hub with the hex head bolts.
Just get them finger tight as we will torque them later.
11) Remove the plastic Allen screw and rubber washer that cover the brake
line opening on the caliper.
12) Install the SpeedBleeders (not provided) into the caliper. This will
aid in brake bleeding later.
13) Mount the caliper to the aluminum bracket using the socket head cap
screws. Torque to 65 ft*lbs. Torque the hex head bolts to 65 ft*lbs. DO NOT
overtighten these as stripping the threads in the Big Reds will cost you another
$1,500. The socket head cap screws go into the caliper. The hex bolts go into
the bracket. DO NOT mix these up or you will have the hex bolt ends interfering
with the rotor.

14) Connect the banjo fitting to the caliper with the screw provided. Use
two brass washers included, one on either side of the banjo fitting.
15) Install the brake pads by sliding them into the caliper (one on each
side of the rotor). Secure by squeezing the middle of the spring clip with
pliers or channel locks and sliding it under the tab. Here is a view of the
Pagid Orange racing brake pads. Refer to the manufacturer's brake pad bedding-in
procedure for optimal performance.


16) Fill the master cylinder reservoir with fresh fluid, and bleed all the
brakes in this order with the car started: right rear, left front, left rear,
right front. By starting the car it assures that the ABS unit gets flushed
with new brake fluid. It may be necessary to bleed the master cylinder as
well. The brake bleeding kit here is shown on the rear brakes.

17) Replace tires and lower the car. Remove jack stands, wheel chocks, yourself
… duh. This should be your final installed view. The kitty litter on the floor
is helping to soak up any spilled brake fluid, blood, sweat, or tears. These
are the stock 1995 VR-4 wheels (6-spoke chrome 18x8.5 wheels). Aftermarket
wheels show off the calipers much better.

18) Don’t forget to torque the lug nuts (90-100 ft lbs).
Take me back to the home page.
Email me at dschilberg@spamcop.net for details of anything on this page. Last updated March 22, 2003 1:56