Team3S Logo, 5k jpg
New York - Munich - Portland - San Francisco - Seattle - Stockholm - Vancouver - Zurich


FAQ:

S-AFC-II Wiring Diagram
SAFC-II Wiring Instructions


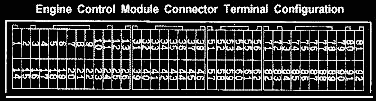
For 1st Generation Stealth and 3000GT (DOHC Models)


Red Gradient Line, 1k GIF


Wiring Connections


AFC Wire

AFC Color

'91-'93 ECU Pin#

'91-'93 ECU Color

Power

Red

12 or 25

1.25 B-R

AirFuel-to-ECU

Pink

70

L-Y

AirFuel-to-Sensor

Orange

70

L-Y

Throttle

Gray

64

1.25 BR-R

Knock

Purple

58

W

RPM

Green

101

W

1stGround

Brown

26 or 13

1.25 B

2ndGround

Black

26 or 13

1.25 B

Number in front of ECU color indicates size(mm), if other than standard.


ECU Color Codes:

B = Black Y = Yellow
R = Red W = White
L = Light Blue BR = Brown


'91-'93 DOHC ECU Harness
(locking tabs face upward)

Connector #52 Connector #54 Connector #53
01...........13 101.......108 51.........61
14...........26 109.......116 62.........72

3-Connector ECU terminal Pinout Diagram


Red Gradient Line, 1k GIF


Wiring Instructions for S-AFC-II


Precautions:

The standard precautions for any work with electronics apply--  Make sure that before you work with any of the wiring, you ground yourself by touching any metal chassis location on the car, that you are using insulated tools, and that you make sure not to allow adjacent wires to touch one another.  It is stressed in boldface in the installation instructions NOT to use electro taps - rather, use the taps included with the installation kit!  After you have hooked everything up, check all your connections twice - even three times, just to make sure you have made the proper splices.  It is also suggested that before you put everything back in place in the ECU compartment and replace the cover, that you reconnect the battery terminal and turn the ignition on to see if the SAFC-II lights go on, just to make sure that you have connected everything correctly.
 

Instructions:

1)  Disconnect the Battery negative terminal.

2)  Locate the ECU module, on the driver's side near the accelerator, and remove the ECU plugs.

3)  Mark each of the wires from the SAFC according to the chart.  Identify the corresponding pinouts from the ECU, as well.

4)  As per the precautions above, splice the Brown ground wire from the SAFC2 to the Black ground wire coming from Pin 26 of the ECU connector, and fairly close to the connector.  ONE cm further away from the ECU harness connector, splice the Black ground wire from the SAFC2 to the same Black wire coming from Pin 26.  Do NOT mix this up!

5)  Locate Pinout 25 on the harness connector and strip and tap the Black-Red wire coming from it.  Splice the Red wire from the SAFC2 to this wire.

6)  Tap Pinout 101 White wire for RPM signal on the connector and splice with with the Green SAFC2 RPM wire.

7)  Tap Pinout 64 Brown-Red Throttle Signal wire from the ECU connector, and splice with the Grey wire from the SAFC2.

8)  CUT the Blue-Yellow wire coming from Pinout 70 on the ECU connector-- Cut a couple of inches from the harness - leave room to "play with".  Connect the Pink wire from the SAFC2 to the ECU-side of the cut wire, and connect the Orange wire from the SAFC2 to the HARNESS side of the cut wire.

9)  Tap the White wire coming from Knock Sensor Pinout 58 on the ECU connector and splice to the Purple wire on the SAFC2.

10)  Tape and zip-tie everything securely so the SAFC2 wires aren't in the way of anything.  The SAFC2 unit itself will be mounted right in front of the center of the A/C console, below the vents and above the controls.  One of the tabs from the U-bracket will be snapped off, sanded and it pressure-fits right in there.  See picture, below.

11)  Before putting the ECU harness back, turn on the ignition to see if the lights come on the SAFC2.  If they do, that's it.  You're done.


Suggested Placement of SAFC-II


Red Gradient Line, 1k GIF

3D & Ram Logo anim, 6k GIF


Team3S FAQ Page


Team3S HOME


All Images ©1995-2004 Bob Forrest, All Rights Reserved.