Team3S Logo, 5k jpg
New York - Portland - San Francisco - Seattle - Stockholm - Vancouver - Wiesbaden - Zurich


FAQ: The Making of a Car Poster

Article by Bob Forrest

Red Gradient Line, 1k GIF


Q.>>>:   Can I take a picture off the web and make it into a poster?

A.>>>:   In a word..., NO.  :-)  The minimum recommended size (number of pixels) for a poster, or any printed output depends on the printer you are using. For example, if you want to print an 8" x 10" photo using your own printer, you'll have to look up the 'pixel resolution' of your printer's various 'quality modes'. You'll always get the best quality output if you match the number of pixels-per-inch of your image to the dots-per-inch resolution of your printer. You CAN use a print resolution that's different from your image resolution and get great results, but for BEST results, try to match the resolution.

If you want to print at high quality, and your printer output for the HQ setting is 300 dpi (dots-per-inch), that means you will need a digital image that is 300 pixels TIMES the size in inches in both dimensions. For an 8x10, that's 8x300 by 10x300, or a pixel size of 2400x3000.

About the lowest acceptable quality you can use is 100 dpi. So for an 8x10 at low quality, that is 8x100 by 10x100, or a pixel size of 800x1000. Many mid-quality digital cameras have pixel resolutions in this range, so you can make an acceptable print up to about 8" x 10" from cameras with that resolution. But the biggest images you will see on the web are about 500x700 pixels, so the *biggest* image you will be able to print from a photo on the web is about 5" x 7", even at the lowest resolution of your printer.


Q.>>>:   Can I 'blow up' such an image to give it more pixels and then make that larger picture into a poster?

A.>>>:   Again, the answer is no. Well, you could, but the quality would be extremely poor. The best way I can illustrate this is to actually show you what 'blowing up' a smaller image into a larger one will do to the quality of the photo.

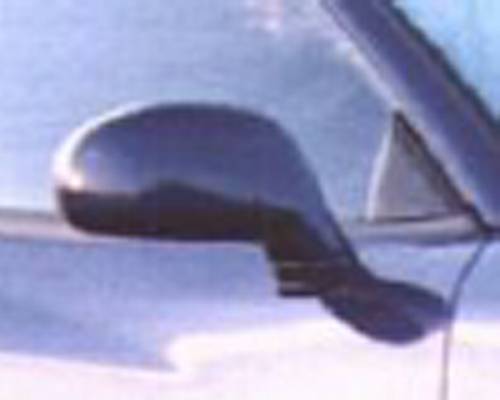
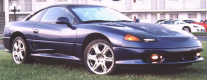
I downloaded a good sharp photo of Eric ("SUTHNR") Bowden's beautiful '93 Stealth R/T off the web, and cropped it to an 800 x 600 section, just to keep the numbers 'even'. As you can see, his image would make a fabulous poster. From that photo, I cropped a small 100 x 80 pixel section of just the rear-view mirror, shown here with a cropped, 'thumbnail' version of the entire photo:

Mirror, 5k JPG          Mirror, 2k JPG

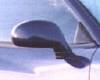
Now if you want to have a lab make a typical 30" x 40" poster of this photo, even at 'low' resolution of 100 dpi, that will be a total pixel resolution of 30x100 by 40x100 or 3000x4000 pixels. Since our original (web) image of the car was 600x800, we would have to blow this up 5 times (5x600=3000, 5x800=4000) to give you the resolution necessary to print it. To show you what will happen to that section of just the mirror when blown up 5 times, I've made it into a 500x400 image, as below:

Mirror, 12k JPG

As you can see, the image has become extremely fuzzy. And you can imagine what the rest of the car will look like at that level of magnification. It's a bad idea all around when you consider both the legal and the photographic aspects-- so you want to download a tiny, "lossy" picture owned by someone else, make each 1 pixel into 5 pixels so it looks like a pile of blurry blocks, and then turn it into a fuzzy poster so you can be sued for $200,000? LOL! Obviously, we have to find another way. Anything you 'find' on the web is not only owned by the photographer, it's too small to output as a large print anyway.


Q.>>>:   So what kind of photograph do I need to make a poster?

A.>>>:   Well, as explained above, the resolution of a digital camera is nowhere near enough to give you what is necessary, but a photo taken with any 35mm camera will do just fine. The photograph of Eric's car is well-lit, well exposed, sharp and clear, so he could easily make a stunning poster from the original film. In fact, even a mural may be made from a sharp 35mm. For a poster, film is the only way to go - not an image from the web or a digital camera... Just a good, crisp 35mm photograph. Bring your film in to a lab and tell them what you want. Note that I said "the film", not a print. A print is always lower quality than the original film it was made from, so dig out the film to get the best quality poster.


Q.>>>:   I saw a photo on the web, and I've got a pretty good camera. What do I need to do to photograph my own car so it looks like this photo?

3000GT-98, 49k JPG


A.>>>:   OK. Now we're getting to the good stuff! There's no single way to give you a whole education in photography on a web page, but there are a number of things you can do (and shouldn't do) to create a high-quality photograph. Since the weather and circumstances won't always cooperate with all of our best plans, sometimes you'll just have to use your sense of logic about taking the picture. But here are some suggestions to get you started:


  1.  Use a slow speed slide film (Kodachrome, Fuji 50...) or print film (Kodak Gold100). If your car is a bright color, you might want to consider one of the enhanced-color films, such as Fuji Velvia slide film or Fuji Sensia print film. As a general rule known by pros for years - you'll always get richer color by using slide film. Use only name brand name films and have them processed at a lab, not the drug store or Costco!


  2.  Never shoot in bright sunlight, if you can possibly avoid it. Shoot only in the early morning or late afternoon on a sunny, cloudless day, and make sure no sun (or very weak rising- or setting sun) hits the car. Either early or late on a bright cloudy day, or even on a rainy day will produce the best results. Right after a rain is a wonderful time for photos of your car, especially if it's dry and everything around it is soaked! (Many car commercials and ads are done in such a setting, even though it's usually synthetic... A water truck wets down the road the car will travel on just before filming - the reflections off the wet road, teamed with the spray behind the car from the tires is always a pleasing effect.) Find an open spot where you may park on blacktop - a large parking lot, an overlook or rest stop on a superhighway, or best of all, a brand new or resurfaced road that isn't open yet. Work with a friend and start with your back to the horizon. At your direction, have your assistant position the car so there are pleasant light reflections visible in your car's finish from your position. You'll probably want a 3/4 shot, like the one above, where you may see more of the front than the side, or vice-versa. Once the car is in a good spot, then is the time for you to start moving about slightly to get that perfect angle and height.

  3.  Use a tripod, so you can take pictures from varying heights, and with solid support for your camera. Try looking through the finder at heights from about 18" off the ground to no more than about 4' off the ground. Take your time and experiment by moving up or down a little at a time - even a change of an inch or two may mean the difference between a good photo and a great one. But it's a pretty good rule that the best photos will NOT be taken from as high as eye level, even if your tripod goes that high. Similarly, for every height that appears to look 'right', varying your position an inch or two right or left can make all the difference. Get down on the ground if you need to - plan ahead by wearing dark work clothes that can get dirty and won't reflect in the car's finish. Doing anything right takes a little longer, so don't rush through this if you really want a photograph that will last a lifetime.

  4.  Shoot with a wide-angle lens (24mm to 35mm) or one of the 'wider' settings on your zoom lens. You can also try a 50 mm 'normal' lens, or normal zoom setting next, and even peek through an 85mm or 105mm slight telephoto for your final photos. If it looks good, shoot it! Since all "shooting scenarios" are different, take photos with different lenses or at several different zoom settings. For each lens or setting, move the camera to a distance from the car where it fills the viewfinder, (or starts to look distorted), then back up a few feet until there is some space around the car in the viewfinder.  Note: This photo above, from the '98 Mitsubishi brochure, was not taken with a wide angle lens, or even a 35mm camera, for that matter. It was photographed with a large-format bellows view camera and stretched a bit, but you can best approximate the look as described here. And a wide angle will give the viewer the best feeling of 'presence', or actually being near the car. But don't just take my word for it, check out other focal lengths anyway.

  5.  If, as you say, you have a 'pretty good camera', then it should have 'manual' as well as 'automatic' settings. You'll want to use the manual settings, referring only to the light meter to determine the proper or 'normal' exposure, then 'bracket' your exposures by taking 3 shots of every position-- one at the 'normal' exposure, then one at 1/2 stop under-exposed, then one at 1/2 stop over-exposed. If using slide film, you may even want to take a 5-shot bracket, adding 1-stop-under and 1-stop-over exposures. Stop the lens down at least to f/8 or more for the wide angle, f/11 for the normal lens, and f/16 for a slight telephoto. Closing down the lens makes your photos sharper, but expect to have long exposures - even up to several seconds if it's early or late in the day, or if there is a heavy cloud cover. Not a problem with a steady tripod... If you are taking long exposures, just pressing the shutter might shake the tripod a bit, so use the self timer for EVERY shot, and don't touch the tripod during the exposure. Most pros press it and walk away for a few seconds, to make sure that their reflection doesn't end up somewhere in the shot.


  6.  There are a couple of 'tricks' you can use to make your car photograph look even better. Naturally, make sure the car is waxed well, and you treat the tires at your photo location with one of those spray products that make the rubber look new. But you can make the surface you're parked on look better too. One of the tricks pros use is to bring along several gallons of water - just prior to shooting, pour it all around your car and use a push broom to spread it out to cover all visible roadway. The reflections of your car off the wet, black road, (especially if it's a light or bright color) can really make a photo look professional. But the best trick of all is to use a couple of gallons of cheap floor wax (I think it was used in the photo above) and spread it out with a thick-nap paint roller with a ceiling pole screwed in... And it's easy to clean it up afterwards, with a couple of gallons of sudsy ammonia and a push-broom to sweep it off to the side of the road. (Don't just leave it there for someone to hurt themselves!)


  7.  The final trick used in the photo above is, unfortunately, done entirely in the computer. The background was softened using 'linear blur', and the wheels were made to appear in motion using 'radial blur'. These aren't tough to do if you've done imaging before, but you'll need a good imaging program like QFX or Corel Paint or even Photoshop to do it. Everything 'behind' the car from the roadway up must be 'masked' and then the linear blur filter applied. Similarly, the wheels must be masked (one at a time) and radial blur applied just to the wheel to give the impression it is spinning slightly... All good imaging programs have these filters, and masking capability, so if you know your way around one of these programs, check the help file for a 'how-to' on applying masks, and applying filters selectively to masked areas. It's just a bit too complex for full details here, but that's how it was done! Here's a 'quickie', showing what you can do with even an 'unposed' photo: Henry Yam's '91 VR4 - first, the original (parked on the street), then, the same shot with a few strategic motion blurs... It's worth playing with these effects if you want to come up with something spectacular for your car!


Blitz Original, 13k GIF


Blitz Blurred, 15k GIF


Red Gradient Line, 1k GIF


Q.>>>:   Your help in guiding us on how to take quality pics are appreciated, but I'm sure some of the more 'photography challenged' persons, myself included, would be interested in any tips you could offer for those of us who own "general quality" cameras - the kind where it self-loads, built-in flash, yadda-yadda. The quality of the pics won't be the same, I'm sure, but perhaps we can get close? Yes? No? Thanx!

A.>>>:   No prob... Since 'general quality' cameras usually have a slightly wide angle lens, you'll be in the ballpark for coming really close to our results. Here are a few quick hints:


  1.  If you don't have a tripod, prop the camera on a box, rock or anything that keeps the camera stable. (Make sure to put the camera toward the front edge of the support, so it doesn't cut off the bottom of the photo).


  2.  If the camera doesn't have a self-timer, SQUEEZE the shutter for every shot while it's resting on its box.


  3.  If you can't turn off the flash, cover it up with something. (Check the camera frequently to make sure you don't melt the flash; let the flash cool uncovered after every couple or few shots).


  4.  Use top quality, fresh film, professional version, if possible. Use low speed film (100ASA or EI), not 400 speed. Leave the cheap film for the Chevy drivers. And get it processed at a lab, not the drug store.


  5.  Don't be reluctant to get down on your belly to look through the finder. Let your eyes tell you what looks good.


  6.  Don't let sunlight hit any part of the lens.


  7.  If your camera has a "zoom" setting, don't use it; stick with the widest setting, and move fairly close to the car.


Happy shooting!


Red Gradient Line, 1k GIF


For more information on working with images,
be sure to visit our terrific page on
Imaging Tips


Red Gradient Line, 1k GIF


e-mail us at...

Email your Comments...

Red Gradient Line, 1k GIF


3D & Ram Logo anim, 6k GIF


Team3S FAQ Page

Team3S HOME


'93 Stealth R/T Photo ©1995-2004 Eric Bowden, All Rights Reserved.
'91 3000GT VR-4 Photo ©1995-2004 Henry Yam, All Rights Reserved.
'98 3000GT VR-4 Photo ©1998-2004 Mitsubishi, All Rights Reserved.
Other Images ©1995-2004 Bob Forrest, All Rights Reserved.