
New York - Munich - Portland - San Francisco - Seattle - Stockholm - Vancouver - Zurich

New York - Munich - Portland - San Francisco - Seattle - Stockholm - Vancouver - Zurich
The
User's Manual... From a User
by
Roger Gerl (Team3S Admin, Switzerland)
![]()
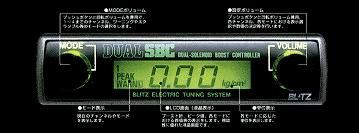
Important: Unfortunately, the original DSBC manual is not of much help. There's a translated version around, but it does not help when it comes to the "how do I tune this thing in" question. This page should help the user to understand how to set up the DSBC and to understand how to tune it in. Many pictures are scanned from the original manual and have been edited to show what the user will get in reality.
Disclaimer: The author is assuming that you are a licensed and certified expert in the automotive and turbocharging field. Also it is necessary that the Blitz DSBC is properly installed and working perfectly. The author is not responsible for any liabilities caused by the following instructions.
Main Displays

This is what you'll see on the display when you've set everything up (here, Ratio in "1" is chosen, Warning set and real time boost meter shown). Turning the Volume knob does not do anything as you'll also not hear any beep. If you change a setting or any display you'll hear a beep for confirmation of the action.

Pushing the Volume button selects the display to be shown 
The figures in the Real Time Boost Monitor are changing very quickly but it helps a lot when checking sustained boost or testing the vacuum. The maximum value to be shown is 2.50 kg/cm2 (~2.50bars). As the display is small I recommend to install a good analog boost meter as well. Only this really shows you a scramble or any wavy behavior of the boost. Pushing the Mode button causes no action on this display mode.

Peak Hold Monitor is updated whenever the boost exceeds the highest measure it has already stored. There's only one peak available (for all settings and modes). The stored value can be cleared by pushing the Mode button when peak is shown on the display.

Ratio Setting Screen shows the current Ratio value for the chosen setting number ("1" Ratio is 50 in this case). The SET marker indicates that this is a value that can be changed. Pushing the Mode button once activates the setting function.
Main Modes
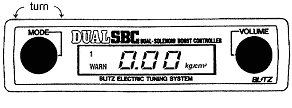
Turning the Mode button in the main displays changes the Mode the DSBC is currently in. 
Setting "1" - "4" selects the stored Ratio values
Mode "M" is only functional when the Boost MAP Analyzer is connected
Mode "OFF" does what it says. It leaves the solenoid valves of the DSBC fully open
"Set Warning" Mode switches the display to red indicating you set the warning boost level and its negative Ratio for limiting boost when necessary.
"Set Scramble boost" is a Mode that allows to in- or decrease boost by in- or decreasing a specific Ratio for a specific time.
 |
 |
|||
| Choose between one of the 4 Ratio presets. | With the MAP Analyzer connected to the DSBC, the Ratio can be changed "boost-wise" and stored in 4 different maps (n/a yet). | Set the DSBC to OFF with this Mode only ! Boost meter and peak hold are still working to check stock behavior. | The built-in limiter function is your cars "life-saver". Setting a limit causes a beep when it is reached. It is not functional if either limit is set to 0.00 or Ratio is -0 !! | Scramble boost is a function that allows the user to set a Ratio (P xx) to be added or deducted from the current Ratio setting (1-4) for a specific time (C x) in seconds. |
![]()
Step 1 : Setting up the limiter
The limiter is the life-insurance for your engine. Check my rebuild page for the results when overboosting way too much ! Set the limiter to a safe boost level to be warned. This level must be determined by yourself and depends heavily on our modifications and the health of the engine. When this level is reached, the Ratio will be reduced by the amount of the set limiter ratio value until boost becomes lower than this level.
Please note that this can cause a very wavy boost behavior and is probably not what you want. Also try to get a setting that reduces the Ratio not more than 5-10% of the chosen Ratio setting. An example : Limiter set to 1.05bars, G34/R48 causes overboost to 1.07bars (beep-beep). G34/R46 goes up to 1.04bars (no warn sign). Therefore choosing the R48 setting and reducing the Ratio by -2 when hitting the limiter is a good idea to get faster boost build-up and better max boost. The warn beep-beep kicks in and reduces boost until it is lower than 1.05bars. Ratio will come back again then to provide the maximum boost, but without the limiter kicks in again.
Summarize :
- The WARN (limiter) function is a life-saver for your engine
- The current set Ratio will be reduced by the stored amount when the limiter is hit; a 'beep-beep' is heard.
- Ratio comes back when boost falls below the warning level
- prevent a wavy boost behavior

It is essential to set this at first as it will prevent you from damaging anything in your engine during your first runs with the car ! Start with a lower value of around 1.00bars and reduce Ratio by 10 points when the limiter is hit. For this do the following :
Turn the Mode knob until you're getting the red display with the WARN icon blinking. It is either showing a boost value like 0.00 or a Ratio reduction like -10.

Pushing the Volume knob selects between the desired warning level of the boost and the Ratio to be reduced when reaching the limiter. Choose the boost warn at first.
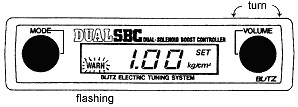
Turning the Volume knob increases or decreases the desired level. When done, push the Volume knob again to jump to the limiter Ratio display. 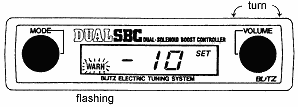
Turning the Volume knob increases or decreases the desired Ratio (0 means limiter is OFF !). The value you choose will be used to reduce the current Ratio when running with the settings "1" - "4" (0...-99). With the setting shown here a Ratio 40 will be reduced to 30 when the limiter is hit.
Please note, if you're running a low Ratio of around 30 and reduce it to 20 on the limiter, the amount of boost will be reduced by about 30% !! This can cause you to lose power for a short time. Of course, it depends on the Gain setting, as a higher Gain value will produce more overboost. A good amount of Ratio to be reduced is always about 10% of the already stored settings (calculate the middle of all four).
There's no need to store the values. Just turn the Mode knob to go back to one of the Ratio Presets.
Step 2 : Setting the GAIN
It's not easy to describe what the GAIN really means. It helps to understand that the DSBC is able to alternate its two valves very quickly, especially when compared to other systems with only one larger valve. WIth this the DSBC is able to increase boost very quickly... but this can cause extreme and dangerous overboost situations. With setting the Gain you are defining how quickly the boost rises. It's in your hands to accept a small overboost but reducing the Ratio to a healthy boost level when hitting the limiter.
Typically, a Twin -Turbo system creates quicker boost than others due to the smaller turbos. Also sequential turbo systems and designs with vacuum canisters are made to get full boost very quickly. The GAIN setting on such systems is much lower than on cars with single turbos !
We now know that the higher the Gain setting is, the faster the turbos build up boost. This is simply done by starting to open the wastegates later, i.e. starting to alternate the Blitz solenoids. The Ratio then controls the length the solenoids stay open (frequency). Looking at the table in the DSBC manual didn't help yet, but as time goes on, the more understandable it becomes. :-) Please take a short look at it!
The first line with GAIN describes the Gain setting for these cars (180SX, Skyline, GT-R, Chaser, Supra TT, RX-7, Lancer EVO) while the next lines describe the Ratio to achieve the pressure in the first column. Please note, that there is a major typo as the 0.10kg should read 1.0 kg and so on :-) The problem was now that we had good results with G30 even without a lot overboost when launching ! But due to the table the car should overboost a lot... and it does. I was able to hold the car's boost with the throttle around 0.5bars in 3rd, 4th and 5th gear. Then boost was already there and the turbos were at their speed. Now I floored the pedal and boost made a huge jump up to 1.35 bars at different rpms (gears). This may not happen when driving around normally and depends on the type of your car!Summarize:
- A smaller Gain lets boost increase slower but prevents any overboost.
- A higher Gain causes a fast boost increase but you'll run the danger of overboost !
- The best is to set a Gain that gives only a small overboost that will be secured by a smaller Ratio limiter setting.
- On the 3000GT the best result was G8/R48 that peaked up to 1.05 bars and produced a steady boost of 1.00bars
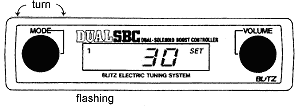
Turn the Mode knob until you're at one of the presets "1" - "4" and push the Volume knob until you see the current Ratio value set. You can still turn the Mode knob to select another preset or other modes.

Now push and hold the Mode knob for about 2 seconds. Then a beep confirms the action and all Ratio presets as well the M sign starts flashing. You're ready to set the Gain value (only one for all presets).
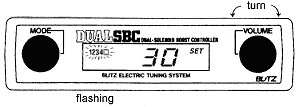
Now turn the Volume knob to in- or de-crease the Gain. In this mode you can always jump between the settings by turning the Mode knob. Simply push the Mode knob again to store the new Gain. If one of the presets is still blinking just push the Mode knob again.
Start with a setting of 5 and increase this step by step during testing. A value between 20 and 30 for single turbos and 5 - 15 for twins or sequential systems is very common.
Please note, the higher the Gain, the more the danger to overboost, as boost rises quicker than the system can respond to. Quick boost rise is good but too much hurts. You have to find the best value for your car by yourself. Testing on a 3000GT VR4 showed any higher Gain than 36 did not help anymore. The best results were achieved around G8 to prevent heavy overboost.
Step 3 : Setting the RATIO
The Ratio is the % of the maximum capable pressure the system can create. Therefore 100% means that the wastegates will never open, but 0% does not mean that they are stuck open! In reality, the wastegate actuators are preload with the internal spring pressure and boost must exceed a specific level until they open the wastegates. You can set Gain to 0 and any Ratio to determine what your system creates. But be careful when increasing Gain then as the pressure rises much quicker then and you'll run into an overboost situation. Always reduce the Ratio at the first run when Gain was increased before.
Summarize :
- Ratio is a percentage of the pressure the system is capable of
- The Ratio determines the max amount of boost produced
- Together with the Gain setting the boost will be achieved quicker than wanted and causes overboost

Turn the Mode knob until you're at one of the presets "1" - "4" and push the Volume knob until you see the current Ratio value set. You can still turn the Mode knob to select another preset or other modes.
Ratio represents the percentage of the maximum outlet a system can produce. Therefore, you can choose a 0 Gain but a very high Ratio to achieve a good boost. But you'll also note a slow boost increase. Typical settings for ratio are between 40 and 60.

Now push Mode knob and the selected Ratio preset starts flashing. You're ready to set the Ratio value for the selected preset.
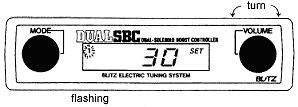
Now turn the Volume knob to in- or decrease the Ratio. In this mode you can always jump between the settings by turning the Mode knob. Simply push the Mode knob again to store the new Gain. The preselect stops flashing then.
Start with a setting of 30 and increase this by a step of 5 during testing. Testing on the 3000GT showed a setting of G32 / R45 resulting in 1.05bars sustained boost giving 397hp peak on the dyno. Lowering the Gain also decreases the peak boost and therefore increasing the Ratio is necessary.
Please note, Ratio and Gain could either be extremely different but also be close together. The Autobahn and dyno tests showed that Gain is always lower than Ratio. On bigger turbos, Gain could be set higher as they do not spool up as quick as smaller turbos or Twin-Turbo systems. Comparisons with the same car but stock smaller turbos exactly prove this. Please also refer to the Gain table in the blitz manual.
At this point, everything needed is set up and you're ready for the first run! Before you start make sure that the SCRAMBLE feature is set to off (either one C or P value is 0).For a 3000GT / Stealth with stock US or EU turbos start with the following :
- Limiter set to a lower level like 1.00 bars with -5 Ratio reducement
- Gain set to 5
- Ratio(s) set to 30, 35, 40, 45Start your engine and run it to check the behavior. With these settings, you should not run into the limiter but close to 1.00bars, depending on your turbo system. Of course it also depends on how healthy your engine is and on the gas quality you run. Together with an analog boost meter, you'll find out the behavior of the boost somewhat better as you can see the overboost and how good the setting holds the boost at WOT.
The best way to determine the overboost is to drive in 3rd or 4th gear and hold boost around 0.5bars with the throttle. Then immediately floor it and watch the boost meter. With a lower Gain boost increases not that quick but stays on the max then. With a higher Gain also much overboost is generated and boost comes back to the max level then. You must determine how much of overboost your engine can handle!
The more Gain, the quicker boost raises. Therefore increase the Gain only in small steps and always check the amount of overboost you'll get then! The gain does not do anything to the max continuous boost you'd like to have.
The more Ratio, the higher boost you'll get. But be careful, as a high Ratio combined with a high Gain can cause excessive overboost, even with a large Ratio reduction when boost hits the limiter. This is due to the system, as the electronics can only act upon a situation that just occurs and then opens the wastegates. If boost rises very quickly, the delay until boost goes down from the open wastegates is somewhat long and therefore it overboosts too much.
If you're familiar with these settings and you can set the Blitz with your eyes closed, you're ready for the scramble boost :
Step 4 : SCRAMBLE Boost setting
SCRAMBLE boost is only 50% what the name says. With this setting you are able to increase or decrease the current Ratio level for a specific time. This sounds similar to the WARN function, and it is indeed something like this.
Increasing the Ratio when a boost level is reached means that the system will produce even more boost for a specific time. This doesn't make a lot of sense, but it can give you a performance where you plan to exceed any safety views! The bigger advantage is to be able to reduce boost for a specific time when the warn level is hit once. This can be a safety feature as you can limit boost to a secure level for a time to allow any parts to cool down.
Scramble boost works better in conjunction with the limiter because these two modes are additional to each other.
Example 1 : When the desired boost level is hit, the limiter reduces the current Ratio by -2 and the scramble by -1 for 2 seconds (a total of -3). This means that after the boost comes below the limiter the Ratio will come back to the set level but with still -1 reduced due to the scramble setting. After the set time the Ratio is coming back to the current setting until the limiter kicks in again.
Example 2 : When the desired boost level is hit, the limiter reduces the current Ratio by -2 but scramble increases this by +1 for 2 seconds (a total of -1). This means that after the boost comes below the limiter Ratio will come back to the set level but with +1 increased. If the limit is then reached again the limiter kicks in again as well as the scramble timer but if not, the boost is increased to a good level for the set time. This can cause a wavy behavior and is not a real great feeling. But setting this up properly can provide the best boost increase (a big Gain) and the highest available boost (bigger total Ratio) that scramble up with the help of this feature.
Summarize :
- Ratio can be reduced or increased for a specific time when the limiter is hit
- Works in conjunction with the WARN limiter
- Provides the best possible performance when properly tuned in with all the settings
(best boost build up with higher GAIN and best max boost due to the increase of the Ratio)
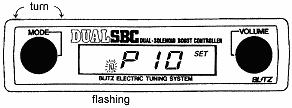
Turn the Mode knob until you're getting the flashing "L" icon blinking. The display is showing either the current set Ratio in- or decrease (like P10 or P-5) or the time setting for the scramble feature like C 3.

Pushing the Volume knob selects between setting the Ratio to be reduced or increased when reaching the limiter. Choose the boost warn at first (see limiter settings).
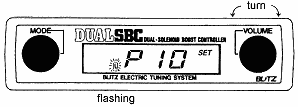
Turning the Volume knob now increases or decreases the desired Ratio (note that 0 means Scramble is OFF !). The value you choose will be used to reduce or increase the current Ratio when running with the settings "1" - "4" (P99...P-99). With the setting shown here a Ratio 40 will be increased to 50 when the warn level is reached is reached. When done, push the Volume knob again to jump to the Scramble time setting display.
Please note, a Ratio increase could cause too much boost and your engine can be killed then! Be careful when experimenting with these settings!!!
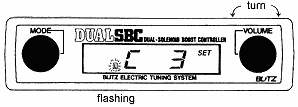
Here turning the Volume knob increases or decreases the time for the Scramble feature (0 means Scramble is OFF !). The value you choose will be used to keep the Ratio at the value for a specific time in seconds (C0...C99). With the setting shown here the new Ratio will be held for 3 seconds.
Please note, if the scramble feature is active and the WARN level is reached again, the timer is reset and starts again.
There's no need to store the values. Just turn the Mode knob to go back to one of the Ratio Presets.
That's it ! Good luck with your tests, and always make sure you're not running with too much boost !
![]()
Questions about your car???
Ask the other owners--
On our FREE mailing list!
Click HERE
![]()

All How-To Images ©
1999-2004 Roger Gerl All Rights Reserved.
All Other Images ©
1995-2004 Bob Forrest, All Rights Reserved.