New York - Munich - Portland - San Francisco - Seattle - Stockholm - Vancouver - Zurich
New York - Munich - Portland - San Francisco - Seattle - Stockholm - Vancouver - Zurich
Instructions & Photos by Jeff Lucius
![]()
OverviewChanging your fuel pump is one of those tasks that sound a lot harder than it actually is. In fact, once you have done it, you should feel comfortable about changing it at the side of the road. These instructions are for the novice and you shouldn't need them again after you change your first Stealth/3000GT fuel pump. You will only need a few tools: #2 Phillips screwdriver; flat-blade screwdriver; 14-mm open-end or flare-nut wrench; 19-mm open-end wrench; 8-mm and 7-mm sockets and a ratchet; and a thin-bladed pocketknife. A hand impact tool and hammer could be helpful. There is no need to remove the gas tank. Raising the car will make the task much easier but it is not a necessity. The hardest part may be loosening the fuel-line fittings.
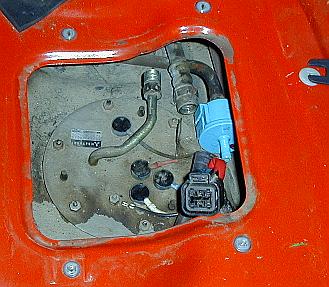
PreliminariesHaving only a 1/4 tank or less of fuel is good, but not required. Raise the car up if you can - ramps, a lift, jack stands. Fold down the rear seat backs and remove the stuff from your rear storage compartment, including the spare tire and both storage bins. I also removed the carpet (2 plastic push-in/pull-out plugs near rear seat) and the cardboard cover (2 Phillips screws in each hinge), to make it easier to work in the compartment. Remove the access cover to the pump assembly on the right side of the compartment floor (4 Phillips screws).
Remove the fuel pump assembly
1. Reduce the fuel-line pressure. Unplug the electrical
connection for the pump (to the rear of the blue, two-way valve). It
is connector F-16 in the electrical configuration and circuit
diagrams. Press down on the top tab and pull it forward. Now try to
start the car. It shouldn't.
3. Remove the high-pressure, fuel line. This is at the end of
the metal pipe coming out of the assembly. It looks like there are
two nuts there (or a bolt and a nut). The "bolt" is fixed to the
metal pipe and does not turn. The "nut" is attached to
the rubber hose. Attach a 14-mm flare-nut wrench (an open-end wrench
will do) to the fixed bolt on the metal pipe. Use a 19-mm open-end
wrench to loosen the nut on the hose by pushing (or pulling) the
wrench toward the outside (passenger-side) of the car. Make sure
that the "bolt" and metal pipe do not move or bend. I found it
easier to work inside the compartment with a foot on the 14-mm
flare-nut wrench. Once the nut is loose, you may be able to remove it
completely by twisting the rubber hose many times. However, it will
be easier to loosen the fitting at the other end of that hose in
front of the gas tank. Here is where it is helpful if the car is
raised. Both pieces spin on the front hose fitting. Loosen the
fitting using the 19-mm wrench on the hose "nut" and the 14-mm wrench
on the metal pipe "bolt". The bolt rotates counterclockwise and the
nut clockwise, as you are laying on your back, head toward front of
car, looking up at the fitting. It is not necessary to disconnect
this fitting; just loosen it.
Remove and replace the pump
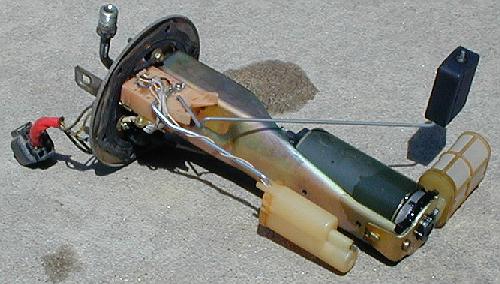
1. Drain the fuel out of the assembly. Let the fuel drain out
of the top and bottom of the assembly (in an environmentally
conscious manner, of course). Does the new pump look like it matches?
Clean any junk off the filter; don't damage the screen. Take care not
to bend the wires attaching the float and low-level sensor while
handling the assembly.
Re-install the pump assembly
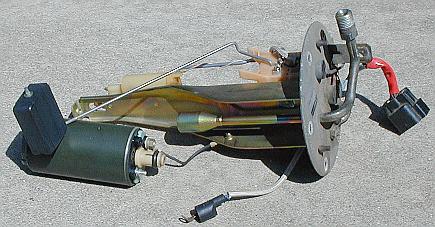
1. Install the assembly. Look over the assembly to make sure
all screws and nuts are tight and the filter and top gasket (the one
with the three protrusions) are clean. Carefully clean off the top of
the tank around the opening. Is the inside of the gas tank in good
shape? Slide the assembly into the tank. Tighten the six 8-mm nuts
down evenly, in a pattern like you would your wheel lug nuts. I
couldn't find any torque specifications, just don't tighten too much. |
![]()
Questions about your car???
Ask the other owners--
On our FREE mailing list!
Click HERE
![]()

Article and How-to Images ©2000-2004 Jeff Lucius, All Rights Reserved.
Other Images ©1995-2004 Bob Forrest, All Rights Reserved.