
Team3S Logo, 5k jpg
New York - Munich - Portland - San Francisco - Seattle - Stockholm - Vancouver - Zurich


Team3S Member Track Report:


Jim Matthews: Second track day experience!  July 27, 2002
Elvington Airfield, North Yorkshire, England
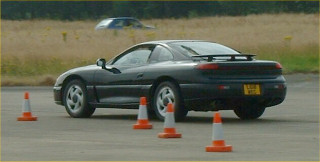
Jim's '94 Stealth RT/TT at Elvington Airfield
Clipping an Apex.  Photo courtesy of Rob G., www.speedyseven.com
{ Click to see a bigger image }


Red Gradient Line, 1k GIF


Introduction

My second ever track event was held at the same location as my first (though organized by a different company), Elvington Airfield near York in North Yorkshire, England.  The course was marked out with cones and was approximately 2.5 miles in length (a different layout than last time).  It was a beautiful, sunny day with temperatures ranging from 60 degrees in the morning to about 75 degrees in the afternoon. The event was non-competitive and an "open pit" policy allowed drivers to enter and exit the track at any time, though the nearly 50 cars in attendance were divided into three classes for the first hour as drivers learned the track.  It cost $135 for 7.5 hours of track time (9am - 5pm with 30 minutes off for lunch) plus $25 for helmet rental (motorcycle helmets were acceptable, so next time I'll use my own!) and $50 for one-on-one instruction.


Red Gradient Line, 1k GIF


Overview

After a brief meeting to discuss rules, flags, etc., we followed a pace car for several slow laps to learn the track. I've attempted to diagram the course in the image below. It's not exactly to scale, but it will have to do. I've assigned a number to each apex and sketched my line around the track. Green identifies the approximate locations where I began full acceleration, yellow where I let off or began feathering the throttle and red where I was hard on the brakes. I will start with the long straight on the left.


{ Click to see a bigger image }

The straight between corners 1 and 2 was long and fast, so acceleration and braking were key. Power was not a problem, and if I entered the straight behind a car, I usually managed to exit in front of it (though in a few cases, this is where I was passed!). My brakes are now sorted out and haul the car down from any speed quickly, fade-free and in a straight line lap after lap. I found myself braking later and harder than most of the other cars, coming into 2 deep, clipping the apex and staying left to set up for 3.

Note that the 115 mph speed indicated on my diagram was the fastest I managed and not a typical terminal velocity. Mashing the throttle all the way down the straight, waiting until a cone rearrangement seemed inevitable and then jumping on the brakes to give the ABS a workout was too hard and tiring (physically and mentally), so on most laps I let off where indicated with yellow to maintain some sense of sanity.

AWD is wonderful on the track. At 3 I could drop the hammer in second gear at the apex before straightening out and exit with much more speed than other cars. In several cases, I could have literally rear-ended other cars coming out of this corner. Stay on the power through 4 and get ready to deal with 5 and 6.

I should point out that I generally took a different line than the other cars. There were several Lotus Elises at the track and it was interesting to follow them through the turns (they are very light and quick in the twisties). They would start turning in earlier and at a higher speed, while I would brake longer, dive in deeper, turn at a slower speed and accelerate sooner. It seemed to work out about the same in the end, though it's surely harder on my tires and brakes than theirs.

It was very difficult for me to find a good line through 5 and 6, partly because the infield was overgrown, obscuring the cones around the bend. At first, I treated it as a single 180 degree sweeper, turning in late, clipping 5 and feathering the throttle in one big screeching arc to clip 6 and exit wide, which left me poorly positioned for 7. My instructor convinced me to treat 5 and 6 as two separate corners, turning in early, clipping 5 under power, braking straight and then turning in late to clip 6 under power. This way, I exited nearer to the inside of the track and was well positioned for 7 and 8.

I found that AWD allowed me to stay on the power all the way through 7 and 8, and at speeds higher than possible when coasting through. Note that this takes some getting used to; when the car gets squirrely, it isn't exactly intuitive that the tires will hook up under acceleration! I think it made my instructor a little uneasy, but the result was that I absolutely blasted out of 8, treating 6 through 9 as a straightaway and reaching 90+ mph. I passed quite a few cars here; in the picture below, the Porsche is next to the cone marking apex 7.


Look out, 911, here I come - FAST!

There was a lot of track between 10 and 11, so I didn't slow down too much before 9 and swung wide around 10, straightening up just before 11 in time to brake. Clip 12 under power in third gear and weave through 13 and 14 before braking and downshifting to second in preparation for 15.

Like 5 and 6, it was hard to find a good line around 16 and 1, and I never was happy with the way I went around. Exiting 15 in second gear built up a lot of speed very quickly, and to avoid scrubbing it off, I tended to go very wide, nowhere near the apex at 1, feathering the throttle in third gear before easing on the power to maximum just before straightening out. Everyone else seemed to be doing the same thing, though it often got them into trouble. There were several agricultural excursions here, as well as a few spins that left cars shrouded in clouds of tire smoke (the M3 went off several times and offered particularly spectacular displays of unintentional rotation). Looking at my diagram, perhaps the same technique that worked for 5 and 6 could have worked here, going wide out of 15, braking, and clipping 1 under power while not exiting as wide.


Red Gradient Line, 1k GIF


Evaluation


Brakes

Poor brake performance (power, fade and longevity) from worn R4-S pads made my previous event a frustrating experience. This time, however, the Stealth was well prepared with fresh Porterfield R4 racing pads clamping cryogenically-treated rotors, and I couldn't be more pleased! I had no idea that pads could make such a difference and am now completely satisfied with their performance. Braking was repeatedly hard, straight and without even a hint of mushiness or fade, and after such a long event, I was surprised to find that the pads still have almost half of their material remaining (well charred, however) and that the rotors, while slightly grooved, seemed to withstand the extra load just fine (no warping at all). The braided stainless steel brake lines sourced from Sweden via Mikael Kenson continue to work flawlessly as well, delivering the fluid a speed shop in Germany charged me a fortune for last summer. I have Motul ready to go in, but there's no sign that I need to do anything at this point. The caliper piston seals are shot, and I'll have them replaced soon (I have the parts but didn't bring my 60 Hz air compressor to Europe).

I'm not convinced that the rear brakes do much of anything, as the rear pads looked no different after the event than before. I wish these cars had an adjustable brake bias...


Engine

The engine was configured the same as last time, with the AVC-R set to 1.00 with a 64% BADC. Power was not a problem, and I was able to out-accelerate most of the other cars on the track (notable exceptions include a modified RX-7, a 550 bhp Skyline GT-R V-spec and a few specialized trailor queens). It's interesting to note that my gas mileage was among the best of the participants. I ran all day on one tank, while some made several runs for fuel (the Skyline was using a quarter tank each session!).

There have been reports of 2nd generation 3000GT/Stealths overheating at the track, but I had never experienced such a problem. My temperature gauge has always been rock solid, even under full boost at 170+ mph on the Autobahn, at sustained maximum power on the dyno in Switzerland, and during my first track event in May. But in the late afternoon near the end of this event (the heat of the day), after several very hard laps (into the boost more) I noticed that the temperature gauge reading was uncomfortably high, only a tick or two under the red zone. After realizing that it wasn't the oil pressure gauge (whew!), I did a slow lap with no boost and pitted when the gauge read normal.

As soon as I pitted, I was distracted by an offer to ride shotgun in the 550 bhp Skyline (brutal acceleration!) and left the engine running on the turbo timer with the hood up. When we returned about ten minutes later, a crowd had gathered around my car and there was coolant everywhere. No one knew where I was and they couldn't figure out how to turn off the engine as it was running with no key in the ignition! As it turns out, the turbo timer is wired such that the radiator fans do not operate. The coolant was still flowing (good), but no cool air was being drawn through the radiator (bad), so things heated right back up and coolant boiled over through the overflow. No harm done, but it gave everyone a real scare! I'm sure a little rewiring will remedy the fan problem, but the real issue is why the engine temperature rose in the first place.


Suspension

The stock suspension was set to Sport (I discovered that ECS reverts to Tour mode when the car is restarted) and the brand new Michelin XGT-Z4 tires were inflated to 39 psi front and 35 psi rear cold, which rose to 46 psi front and 40 psi rear after a typical session. Traction was certainly an issue when trying to carry speed through corners, and while race rubber would surely improve lap times, I'm more interested in learning how the car performs as configured for the street. Also, chances are always good that the track will be wet here in the UK, and all-season road tires may offer more grip than racing tires. On the other hand, these 245/45ZR17 XGT-Z4s are $200 a pop, far more than Kuhmos. At any rate, this long event consumed about 1/3 of the tread from the front tires and perhaps 1/6 from the rears. Wear was very even, and the sidewalls showed no indication of rollover.

Again, I found handling to be very neutral and controllable. As with most AWD vehicles, it tends to understeer slightly under acceleration and oversteer slightly on trail throttle or braking. I quite like the ability to modulate direction in this way and think it makes it easier to drive the car quickly. A lot of folks on the track were getting bit hard by a combination of excessive speed and undesirable handling characteristics, forcing them to "weed" their cars in the pits.


Summary

What a blast! I think there are few cars out there that are so comfortable and safe yet so fast and capable. A real pleasure.


Red Gradient Line, 1k GIF


Dodge Stealth, Lotus Elise, Caterham 7, BMW M3


Skyline GT-R V-Spec, Dodge Stealth, A.C. Cobra 427


Ariel Atom (street legal!)


Lancia Delta (famous rally car)


Red Gradient Line, 1k GIF


Jim Matthews (email)
http://www.the-matthews.com/stealth.html


Jet Black '94 Dodge Stealth R/T Twin-Turbo AWD AWS 6-spd Adjustable Active Suspension, Adjustable Exhaust System K&N FIPK, A'PEXi Super AVC-R v.1 (1.0 bar @ 64% BADC) A'PEXi Turbo Timer (30 sec), Blitz Super Blow-Off Valve Magnecore spark plug wires, Optima Red Top 830 Battery Redline synth fluids (trans= MT-90, xfer & diff= SPHvy) Cryoed rotors, R4S pads, braided lines, red calipers Michelin Pilot XGT-Z4 245/45ZR17, Top Speed: 171 mph G-Tech Pro: 0-60 4.79 sec, 1/4 13.16 sec @ 113.9 mph 1 Feb 99 Dyno Session: 367 SAE HP, 354 lb-ft torque


Red Gradient Line, 1k GIF


Team3S FAQ Page


Back to the Race Reports Page


Article & Track Photos © 2002-2004 Jim Matthews, All Rights Reserved.
Other Images ©1995-2004 Bob Forrest, All Rights Reserved.