
New York - Munich - Portland - San Francisco - Seattle - Stockholm - Vancouver - Zurich
New York - Munich - Portland - San Francisco - Seattle - Stockholm - Vancouver - Zurich
![]()
|
Background For quite some time, I had been
experiencing a handling problem with my Dodge Stealth. It just didn't seem quite
right. The car felt sloppy, there was far too much body roll, etc. etc. After
having several mechanics examine my vehicle only to tell me that that I owed them $60 for
labor, I decided that it was high time to begin replacing parts out.
(Click images to see larger versions). Hopefully, you will find the documentation of my install helpful.
What You Will Need Here is a minimal list of what you will need to perform the installation: |
|
|
Socket wrench with 12,14,17,19, and 21mm socket attachments |
|
|
Hydraulic jack w/jackstands |
|
|
Philips head screwdriver |
|
|
Tie wraps |
|
|
Some extra rubber hose |
|
|
Cutting tool (razor, exact-o knife, boxboard cutter, etc.) |
|
|
Anti-seize compound (if you don't use this, you should be shot) |
What You Should Have/Get
Likewise, here is a list of what you should have, which will make things easier.
|
|
MacPherson strut tool |
|
|
WD-40/liquid wrench |
|
|
Air wrench (don't we all need one of these!) |
|
|
New rubber dampers (bump stops) |
|
|
New rubber perch seals |
|
|
Flat rubber sheet (preferably tool chest rubber lining) |
|
|
Rack and pinion steering emergency boots (will explain later) |
![]()
|
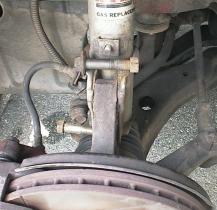
Front Struts Let's start with the front set. Jack up the car and place the jack stands underneath it. Next, remove the front wheels. Once the wheels are off, you will be able to clearly see the front struts. For those of you equipped with ECS, you will need to remove the front screw which holds the ECS connection.
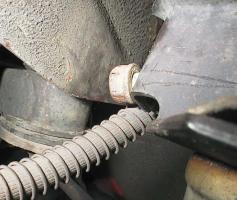
The next bolt which needs to be removed is the brakeline bracket bolt. This bolt can be found located on the rear of the strut. Using a 12mm socket wrench, remove the bolt. Since the bolt is located so close to the rear of the wheel well, an open end wrench may need to be used instead.
The lower mounting bolts are the next to go. The lower mounting bolts are the front two bolts on the lower portion of the strut.
You are almost done with removing the front struts. The next bolts which need to be removed are the upper strut mounting nuts. Open the hood of the vehicle and locate the upper strut mount. Using a 14mm socket wrench, remove the upper strut nuts. For some reason, these nuts were kind of a pain for me to remove, so I had to use a special tool (called my impact fist) for several minutes to free up the nuts. WD-40 would help free them up.
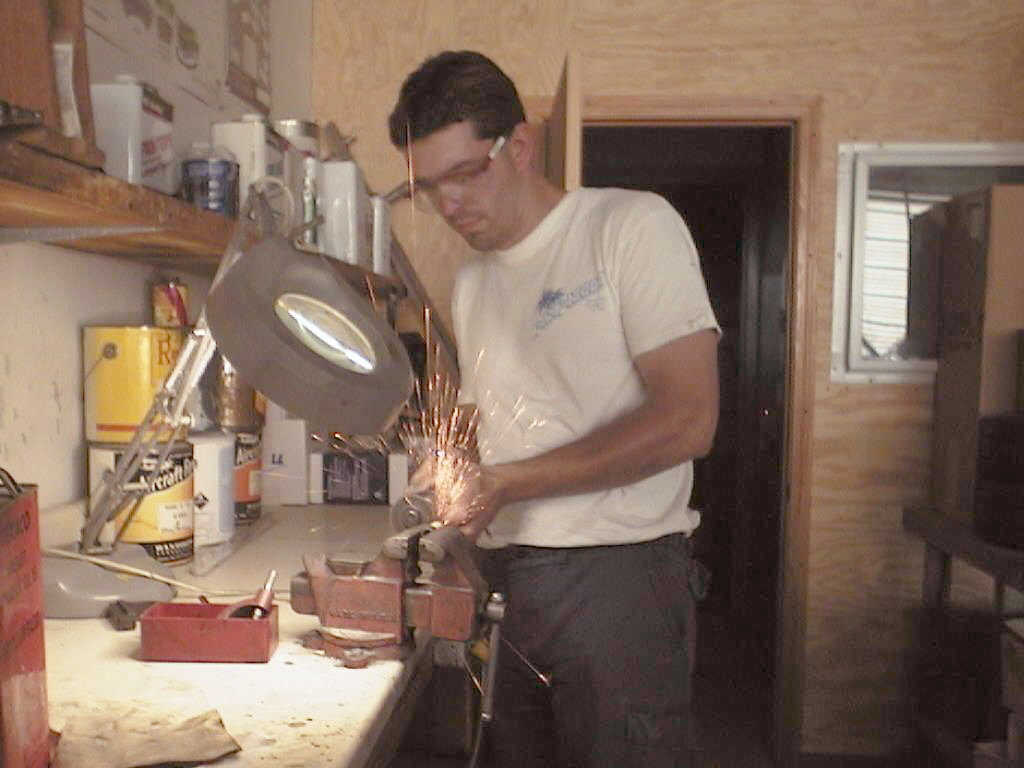
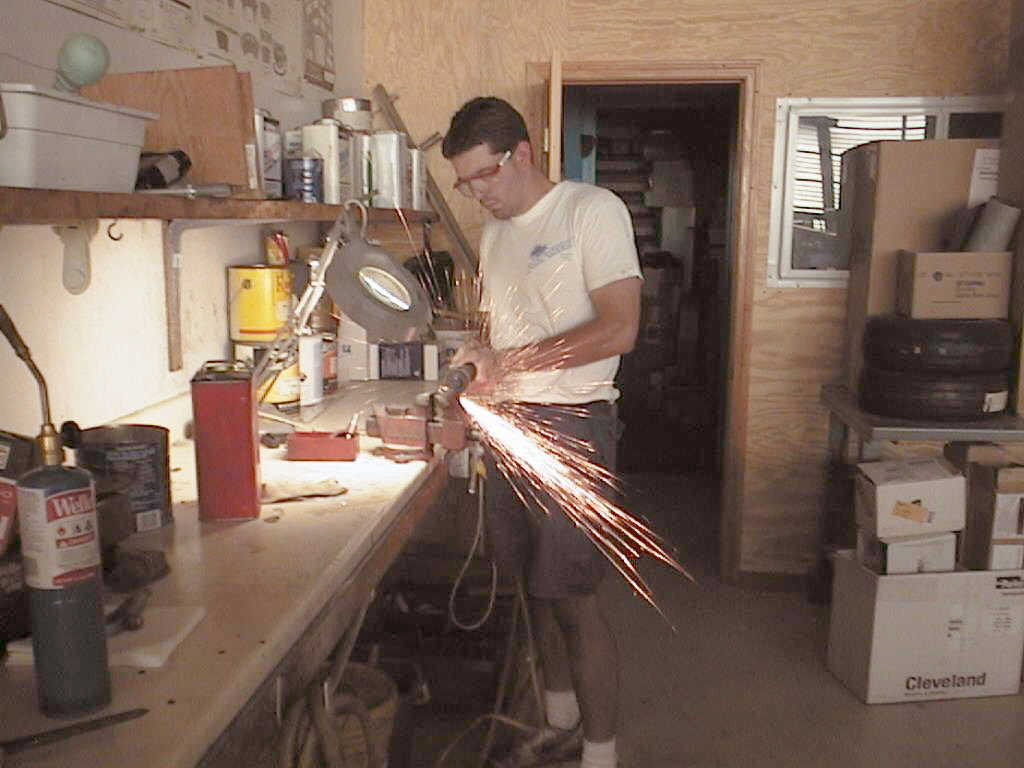
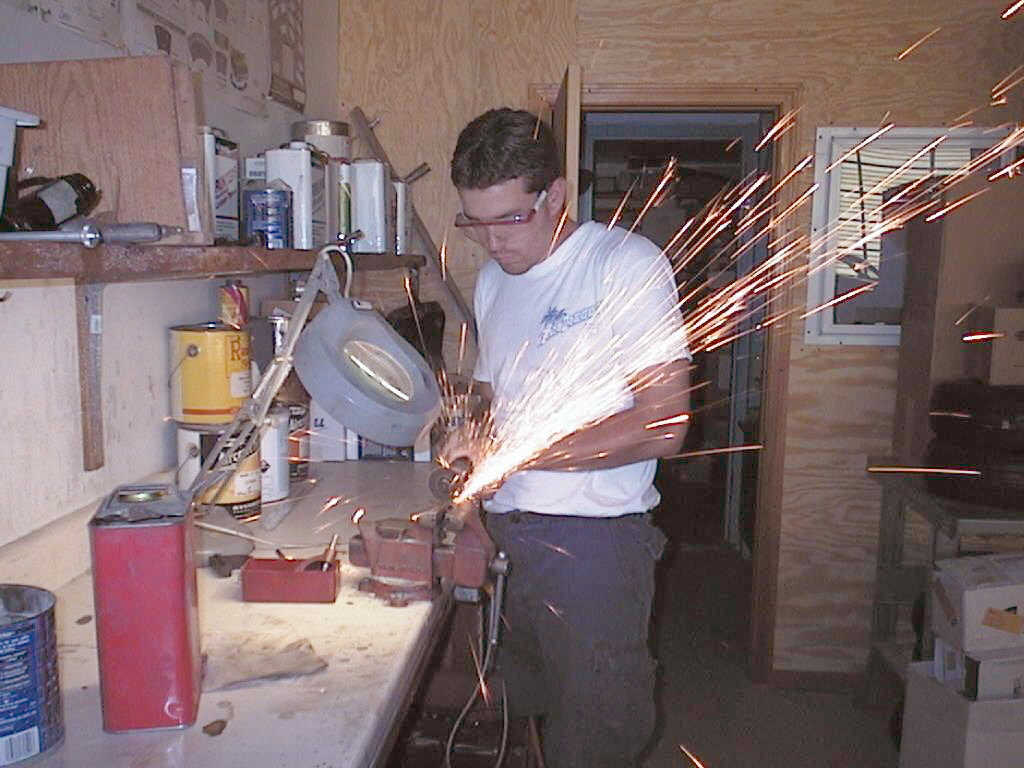
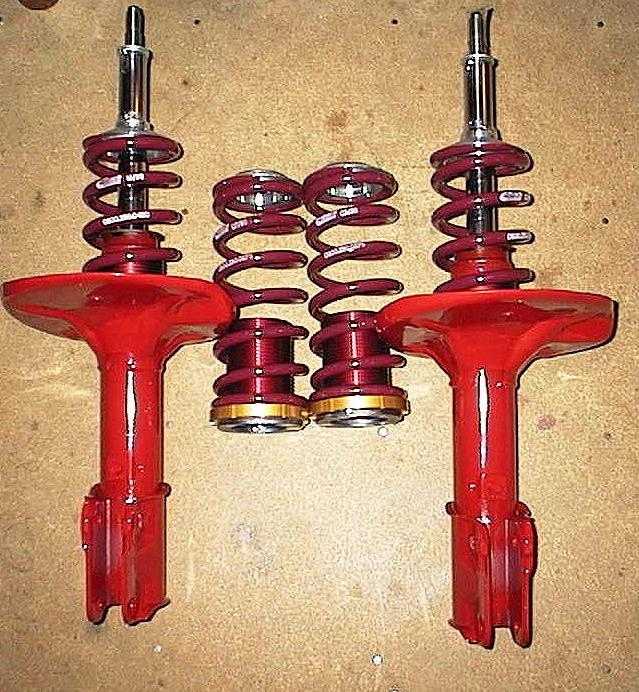
Now the strut should come out easily. If you are the true do-it-yourselfer, then you will want to take the strut apart with a Macpherson strut compression tool. However, if you are lazy, like me, then you will simply take the struts to your local Sears/Pep Boys/Autozone/etc. and have them take the struts apart for you (for about $10 a piece). Your stock strut configuration relies on both static and dynamic spring compression, while the Ground Control setup relies completely on dynamic compression. Note: From this point forth on the front strut install, I do not have any pics. It was raining like a son-of-a-gun, and I was too hot, sweaty, and wet to take pictures. Sorry.
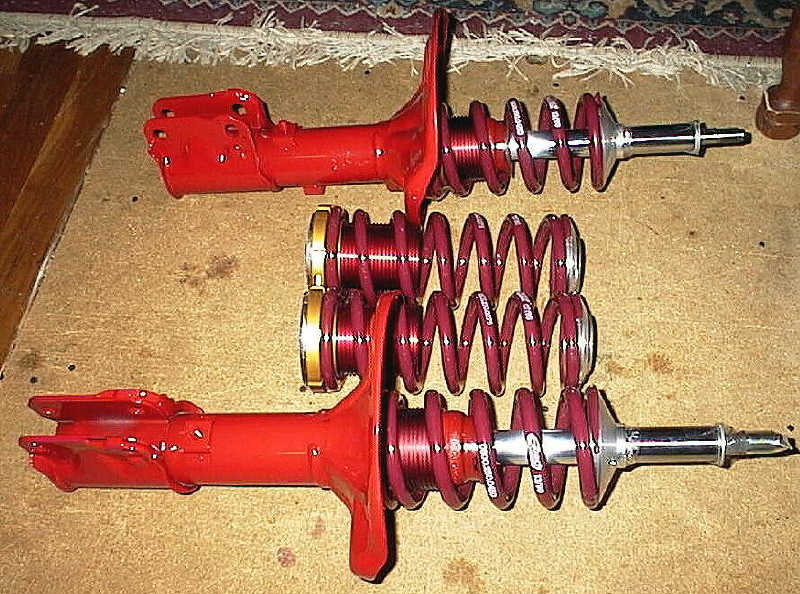
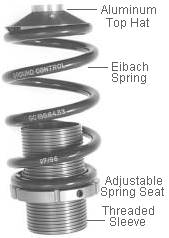
The following picture will help you in determining which part of the Ground Control spring I am discussing: Now, with the strut apart, begin assembling the new setup. Remove the collar (adjustable spring seat) from the threaded sleeve. Place the threaded sleeve over the strut, then screw the collar back on. Now place the spring over the strut and onto the collar.
Ground Control recommends that you perform several modifications to your strut parts. One of which is to cut the top bump stop in half. Using your cutting tool, cut the bump stop, and place it over the strut. Another recommended modifications is to remove the strut dust boot, due to the fact that the springs are too small. This is true; however, I do not think it is wise to drive around without a dust boot, since dirt and particles can get into the strut and ruin it. Thanks to a resourceful worker at AutoZone, a workaround has been found. Purchase a rack and pinion steering emergency boot kit and cut the ends open large enough to fit over the strut. Now place it on the strut, inside of the spring. Though the fit is a little snug, this will do the job nicely. :)
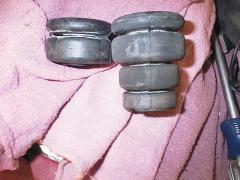
The purpose of the rubber sheet I mentioned previously is to assist in removing the possibility of incurring any spring "clunking", which can be a common problem with aftermarket springs. My primary concern with the Ground Control unit is the aluminum top hat striking against the top of the spring. Place the aluminum top hat on the rubber sheet. Using a cutting tool, cut a circle slightly larger than the top hat itself. Make sure to cut/drill 2 on either side of the top hat as well. Pictured are the rubber discs for the rear spring top hats. Sandwich the rubber discs between the spring and the aluminum top hat. The aluminum top hat must be secured to the spring. To do this, use tie wraps. Slide the tie wraps through the holes on either side of the aluminum top hat and around the top of the spring. Pull the tie wrap until it is snug, then remove the excess. Though not the most ideal set-up, tie wraps do the job nicely. After all, your only concern is in keeping the top hat on the spring when the spring rarifies. Ground Control supplies 2 fender washers for each strut. Use a little adhesive (RTV compound works great, but tape is ok too) and stick the fender washers together, then place them on top of the top hat. Finally, place the stock upper spring perch on, followed by the upper mounting plate (the black object with the upper mounting bolts on it). Locate the 19mm self-locking nut from the OEM set-up and put it on the center top thread, which is located on the top of the strut. Hold the OEM upper spring perch in place while tightening the nut. If the OEM upper spring perch moves while tightening the nut, then the nut is not being tightened. Follow the removal procedure, listed above, in reverse order to place the struts back on.
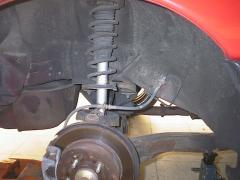
Rear Shocks
After getting the wheel off, the first thing to remove is the
rear brakeline bolt. This bolt is located in front of the shock, mounted on lower
arm. Using a 12mm socket, remove the brakeline bolt. Move the brakeline as far
out of the way as possible, as it will get in the way once you try to take the shock out.
:-)
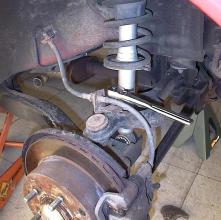
Now, remove the lower mounting bolt. This bolt is located
behind the shock, so you will have to get on your back and get underneath the car.
Using a 17mm socket wrench, unscrew the bolt.
Only the top mounting bolts need to be removed now. Hopefully you have cleared your trunk out ahead of time in preparation for this. :-) If not, then you should do so now.
Again, if you are a true do-it-yourselfer, you can use a spring tool and remove the spring from the shock. However, if you are lazy, like me, take it to your local Pep Boys/etc. to have them take it apart for you. Other Team3S members have suggested that you can also jack up the entire arm, compressing the spring, then remove the top bolt while the shock is still in place. Since I don't like to deal with compressed springs (too much energy), I did not do it this way. However, feel free to try it out. Once the shock has been removed and the assembly taken apart, it is time to install the Ground Control unit onto the shock. Ground Control supplies a large (huge, actually) fender washer. Take this washer and place it onto the shock absorber first. Remove adjustable spring perch from the collar, and place the threaded collar onto the shock absorber. If the collar fits fine, with no problems, then skip the next part. However, if you are in the same boat that I am in, the collar is much too wide to fit snugly around the shock absorber. Therefore a fix is needed.
Once the collar is on snugly, screw on the adjustable lower spring perch. Next, place the Ground Control spring on over the shock and onto the lower spring perch.
Fabricate some rubber discs, as discussed in the section on installing the front struts. Place the rubber disc on top of the spring. Now place the aluminum top hat on top of it. Secure the top hat onto the top of the spring using tie wraps. The unit should now look like picture to the right, with a boot. (I did not have a boot at the time I did the rears). Place the fender washers supplied by Ground Control on top of the top spring hat, and adhere them together with RTV sealant (or crazy glue, tape, etc) to reduce the chances of any rattle.
 Place the addtional damper right on top of the washers, as seen in the pic to the right and above .
Ground Control suggests removing the OEM top spring bump rubber, since it no longer seems to serve any purpose. I left it in, for it certainly couldn't hurt to have it there. Place the OEM upper spring plate on top.
Follow the installation steps in reverse order to put the new
shocks back in.
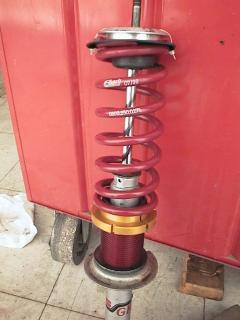
Here is a picture of the Ground Control rear shock set-up.
Finishing Up After installing the shocks/struts, make certain that the lower perch has been tightened in place. I suggest that you move the adjustable spring perch to its highest location when first dropping the car down. In case any problems arise, you'll be less likely to incur damage at this "stock" setting. Drive the car around a bit feel how it handles. Listen for noises. If it seems fine, then lower the car to the height you desire. Make sure to go have the car aligned once you drop the ride height!
My Opinion All I can say is WoW! This is some set-up! The car now handles better than it ever has, and there seems to be less understeer than before, which is very nice, indeed. I really have to hold on tight in the corners, because the car holds to the ground much better than I can hold on to my seat. :-) Here is a quick picture to give you an idea of the "lowered" look. Not very "low", but the performance increase is definitely there, and that's what's important.
Hopefully this page helped you out. Have fun!
Questions about your car???
Article & How-to Images © 1999-2004 Dennis Bretton, All Rights Reserved. |

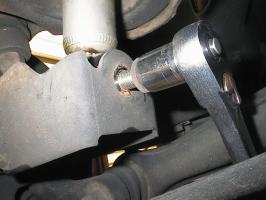
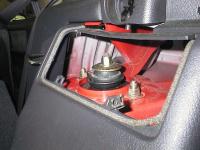 After opening
the trunk, remove the strut mount covers using a Philips head screwdriver. Behind
the cover the 2 top mounting bolts should be visible. Using a 14mm socket wrench or
open end wrench, remove these two top bolts. Be prepared for the shock to drop,
though, as there is no longer anything holding it in place.
After opening
the trunk, remove the strut mount covers using a Philips head screwdriver. Behind
the cover the 2 top mounting bolts should be visible. Using a 14mm socket wrench or
open end wrench, remove these two top bolts. Be prepared for the shock to drop,
though, as there is no longer anything holding it in place. 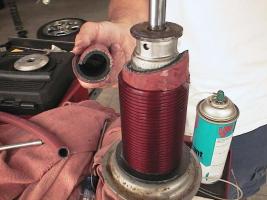
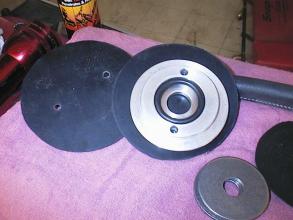
 On top of the rubber damper should be another damper. This damper
has a metal cylinder in the middle. Put this on the shock now. For some reason,
(!$$#@ mechanic who did my shocks last), I was lacking one of these
additional dampers. My brother, however, was more than happy to fabricate a new one
for me:
On top of the rubber damper should be another damper. This damper
has a metal cylinder in the middle. Put this on the shock now. For some reason,
(!$$#@ mechanic who did my shocks last), I was lacking one of these
additional dampers. My brother, however, was more than happy to fabricate a new one
for me: